


Entering the realm of barista-level coffee at home can be an exciting and rewarding journey. One crucial factor distinguishing an ordinary cup of coffee from a cafe-quality experience is the froth. Attaining the perfect froth for your coffee or latte might appear challenging. Still, with the appropriate tools and techniques, it transforms into a straightforward and enjoyable process with the Mini Frother Tips for Coffee and Lattes.
This thorough guide delves into the art of frothing with the Best Mini Milk Frother, offering expert tips and techniques to enhance your at-home coffee experience. Whether you’re a seasoned coffee enthusiast or just beginning to explore your morning brews, these insights will assist you in crafting velvety, creamy froth comparable to your favorite coffee shop.
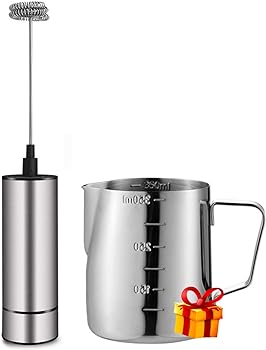
Understanding Your Mini Frother
Before diving into the tips and techniques, it’s essential to understand the tool at hand – the mini frother. These compact devices are designed to aerate milk, creating froth for various coffee beverages. Mini frothers typically consist of a motorized wand with a whisk at the end, making them easy to handle and suitable for small quantities of milk.
Tip 1: Choose the Right Milk
The type of milk you use is crucial in achieving the perfect froth. With its higher fat content, whole milk tends to froth better than skim or low-fat alternatives. However, almond and soy milk can also produce excellent froth if you prefer a dairy-free option. Experiment with different milk types to find the one that suits your taste and frothing preferences.
Tip 2: Use Fresh and Cold Milk
For optimal frothing results, start with fresh and cold milk. Cold milk froths more effectively and creates a denser, longer-lasting froth. Using milk straight from the refrigerator ensures that it is at the right temperature for frothing, helping you achieve that ideal creamy texture.
Frothing Techniques for Coffee and Lattes
Now that you understand your mini frother well and the importance of choosing the right milk, let’s explore some expert techniques to achieve barista-level froth for your coffee and lattes.
Technique 1: Submerge and Tilt
When frothing, start by submerging the mini frother’s whisk just below the milk’s surface. Tilt the frother slightly to create a vortex, allowing air to be incorporated evenly. This technique helps develop a rich and creamy froth, giving your coffee a luxurious texture.
Technique 2: Move in a Circular Motion
Instead of keeping the frother stationary, move it in a circular motion within the milk. This motion promotes even aeration and ensures that the froth is consistent throughout. Experiment with the speed and size of your circles to find the sweet spot for creating the desired froth density.
Technique 3: Control the Depth
Adjusting the depth of the frother in the milk can significantly impact the frothing process. For a cappuccino-style froth, keep the frother closer to the surface, incorporating more air. If you prefer a latte-style froth, submerge the frother deeper to create a smoother, silkier texture.
Technique 4: Pay Attention to Temperature
While the mini frother does an excellent job of creating froth, it’s essential to monitor the temperature of the milk simultaneously. Overheating the milk can produce a scorched flavor and reduce the froth quality. Aim for a temperature between 150°F to 160°F (65°C to 71°C) for the perfect balance of heat and frothiness.
Technique 5: Experiment with Frothing Time
The duration for which you froth the milk also affects the final result. Froth for a shorter time if you prefer a microfoam for lattes or extend the frothing time for a thicker, more robust froth suitable for cappuccinos. Practice and experimentation will help you find the ideal frothing time based on your taste preferences.
Conclusion
Mastering the art of frothing with a mini frother opens up a world of possibilities for creating cafe-quality coffee and lattes in the comfort of your home. With the right techniques and tips, you can elevate your morning routine and impress friends and family with your barista-worthy creations. Remember to choose the right milk, experiment with frothing techniques, and pay attention to details like temperature and frothing time to achieve the perfect froth every time.
Incorporating these mini frother tips for coffee and lattes into your routine will enhance the flavor and texture of your beverages and make the process a joyful and satisfying experience. So, go ahead, unleash your inner barista, and savor the delightful frothiness of your homemade coffee creations.
You Might Be Interested In
- How to Use a Budget-Friendly Mini Frother for Home Use
- How To Make Amaretto Coffee Creamer?
- How to Use a Compact Electric Milk Frother: A Step-by-Step Guide
- How To Empty A Bunn Coffee Maker?
- How To Set Clock On Cuisinart Coffee Maker?
FAQs on Mini Frother Tips for Coffee and Lattes
To address common queries and concerns about using a mini frother for coffee and lattes, here are five detailed FAQs:
Can I Froth Non-Dairy Milk Successfully?
Absolutely! While whole dairy milk tends to froth the best, non-dairy alternatives like almond, soy, and oat milk can also produce excellent results. It may require experimentation to find the non-dairy milk that best fits your taste preferences, but many users have successfully achieved creamy froth with plant-based options.
How Do I Clean My Mini Frother?
Cleaning your mini frother is a simple process. Most mini frothers have detachable whisk heads easily rinsed under warm water. Clean the frother after each use to prevent any milk residue from affecting the frothing performance. Some models are even dishwasher-safe for added convenience.
Why Isn’t My Froth Holding Up?
If your froth is not holding up or dissipating quickly, it could be due to various factors. Ensure you are using fresh, cold milk and frothing at the right temperature. Additionally, over-frothing can lead to large bubbles that break down quickly. Experiment with your frothing techniques and times to achieve a froth that maintains its structure.
Can I Froth Milk Without a Frother?
While a mini frother makes the process easier, you can still froth milk without one. Use a French press, a handheld whisk, or even a jar with a tight-fitting lid. Heat the milk, then vigorously whisk or shake it until froth forms. While the process may take a bit longer and require more effort, it is a viable alternative if you don’t have a dedicated frother.
Can I Froth Cold Milk?
Frothing cold milk can be challenging, as it requires more effort to create the desired froth. To froth cold milk successfully, use a frother with higher power and froth for a slightly longer duration. Keep in mind that the froth may not be as dense as froth created with warm milk, but it can still add a delightful touch to cold coffee beverages.
2 Comments
This is such a helpful and inspiring guide! I love how it makes achieving cafe-quality froth at home feel so accessible. Can’t wait to try out the tips and elevate my coffee game!
This guide is a fantastic resource for anyone looking to level up their at-home coffee game! The tips and techniques for frothing are super helpful, and I can already imagine the delicious lattes I’ll be making. Thanks for sharing such valuable insights!